The Witcher 3 Wild Hunt: Map of important locations M17 The Witcher 3 Guide
Last update: Wednesday, December 22, 2021
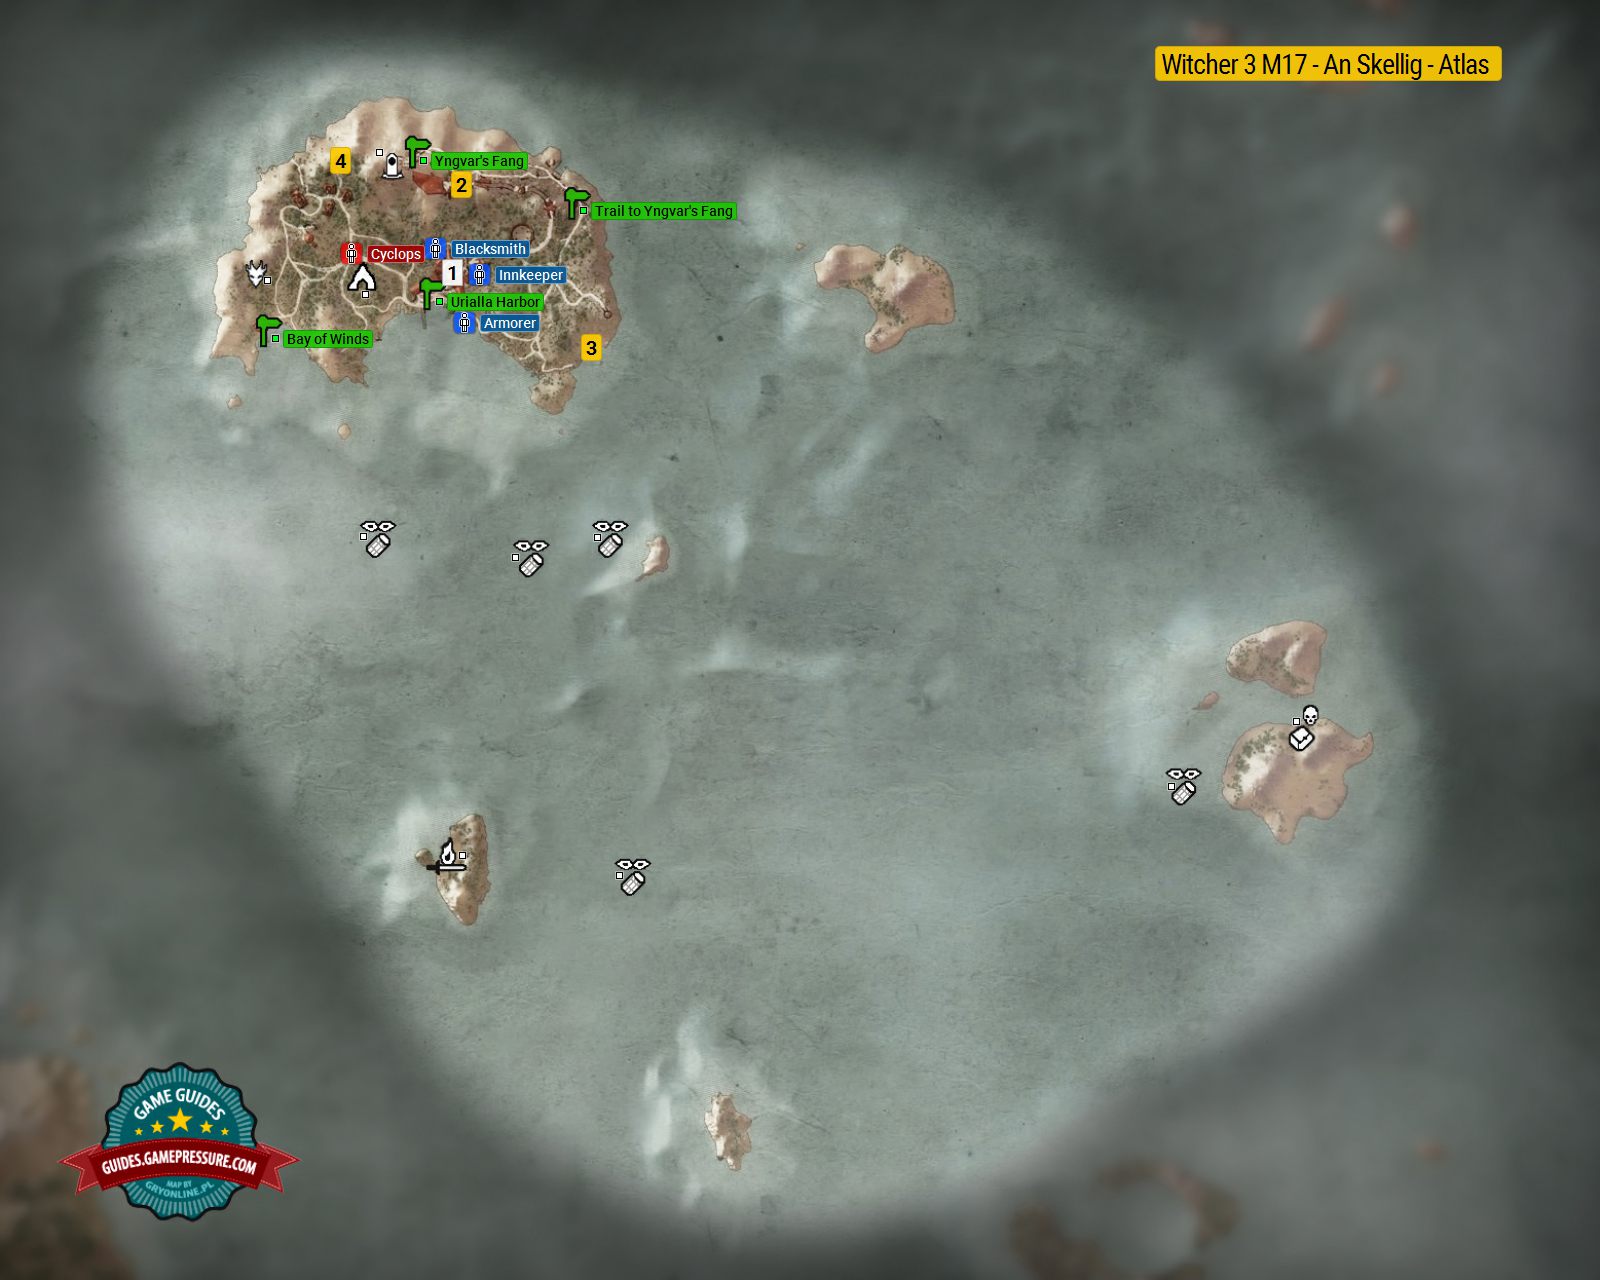
Key points of Witcher 3 M17 - An Skellig - Atlas
1,2,3... - Main locations on the map
Points of interest on the map
Road signs
Strong enemies
Important NPC characters on the map
1,2,3... - Main locations on the map
1 – Urialla
Small village, in which you will find blacksmith, armorer, inn, grindstone and table to improve your armor. You can start two side quests here.
2 – Ruined tower
Enter the tower and go down using stairs. Defeat wraith (lvl 7). Go further and at the and of the tunnel use the lever. All the doors will open. Defeat another 2 wraiths (lvl 7). In one of the rooms is passage down. Go on. Defeat wraith (lvl 20). Get out of the tunnel. Enter the room with chest. Inside you will find diagrams for the witcher ursine gear set: armor, boots, gauntlets and trousers.
3 – Hidden treasure
Defeat 2 sirens (lvl 13). Take the book from the dead's body and read it. Swimm to the mast on the sea. The chest with treasure is on the deck of sunkek ship. Inside you will find several intresting items, for example, nilfgaardian special forces insignia.
4 – Hidden treasure
Defeat 3 bandits (lvl 24). The chest is behind the rock. You will find Diagram: Griffin Steel Sword - Superior inside.
Important NPC characters on the map
Blacksmith – He sell many runestones, crafting materials and very good silver swords. He can forge weapon on Amateur level.
Armorer – He sells many different schemes and crafting materials. He can forge armor on Amateur level.
Innkeeper – He sells food and gwent's cards.
Strong enemies
Cyclops
On this page of the Witcher 3 Wild Hunt guide, you will find a map of An Skellig island and smaller surrounding islands that are part of the Skellige archipelago. On the map of the world atlas we have marked, among others, important areas of An Skellig, as well as locations of treasures found underwater.
- An Skellig: Location description
- An Skellig: Most important places
- An Skellig: Enemy types
- An Skellig: Important information
An Skellig: Location description
The map above shows An Skellig island and its surroundings. Most content can be found on the largest island located on the northwest.
You will find here a large village in which all merchants you could need can be found. Despite its small size, the island is full of interesting things, so you should visit it.
An Skellig: Most important places
1. Urialla
A middle-sized village located on the south of the largest island on the map - An Skellig. Here you will find all most important merchants and craftsmen. You can visit a blacksmith, armore, common merchant and even an inn. Additionally, you will start two side quests here - The tower outta nowhere and The path of warrior.
2. Ruined tower
In the tower you will find a whole set of diagrams for the witcher bear school gear. You should visit this place during the path of warrior quest.
Walk inside and go downstairs. Defeat a wraith on level 7. Go to the end of the room and use a lever. All cells will open. Defeat two more wraiths at level 7. In one of the cells you will find a passage down. Use it and keep going. Defeat a wraith at level 20. Leave the tunnel. You will enter a room with a chest. Inside you will find diagrams for: armor, boots, gauntlets and trousers of the bear school. After you take all items three wraiths will appear (level 20). To leave the room you must use the lever next to the bars.
An Skellig: Enemy types
Drowner
White wolf
Cyclops
Harpy
Golem
Bear
Siren
Earth Elemental
Werewolf
Alghoul
Bandit
Endrega warrior
Ekhidna
An Skellig: Important information
If you would like to sell accumulated items, buy some supplies, make an armor or weapon, go to the village on An Skellige island. You will find everything you could need there. Sadly, both the armorer and the blacksmith can create items only on amateur level.
While traveling through the waters watch out for the state of your boat. Both in the waters and in the skies there are many sirens and ekhidnas that can make it much harder for you to travel. Enemies are usually found near smugglers' cache and spoils of war, so simply avoid those markings if you don't intend to fight them.
Don't forget to visit the Places of Power on An Skellig island. By doing so, you will receive additional skill point. You don't need to make an separate walk there, you will by passing near it during the path of warrior quest.

